
Learn how to prepare a Discord mass DM in Growtiko in five steps: compose the message, choose an audience, review, send a test, and check it in Discord.

Preparing a Discord mass DM starts with a message and the right audience. Growtiko brings the composer, audience selection, preview, and sending controls into one Broadcast workflow. These five steps show how to set up your campaign and check a test in your own inbox before sending to a wider audience.
Use Test (Me) for this walkthrough. Before sending to other people, check their permission, delivery settings, and opt out preferences, and follow Discord’s rules. Joining a server is not consent to bulk DMs. Our Discord mass DM guide explains what to consider before choosing a wider audience.
1. Open Broadcast and choose your server
View screenshot 1 at full size
Open Growtiko and select Broadcast from the left sidebar. Check the server selector so you are working in the right community. The example uses the Growtiko server.
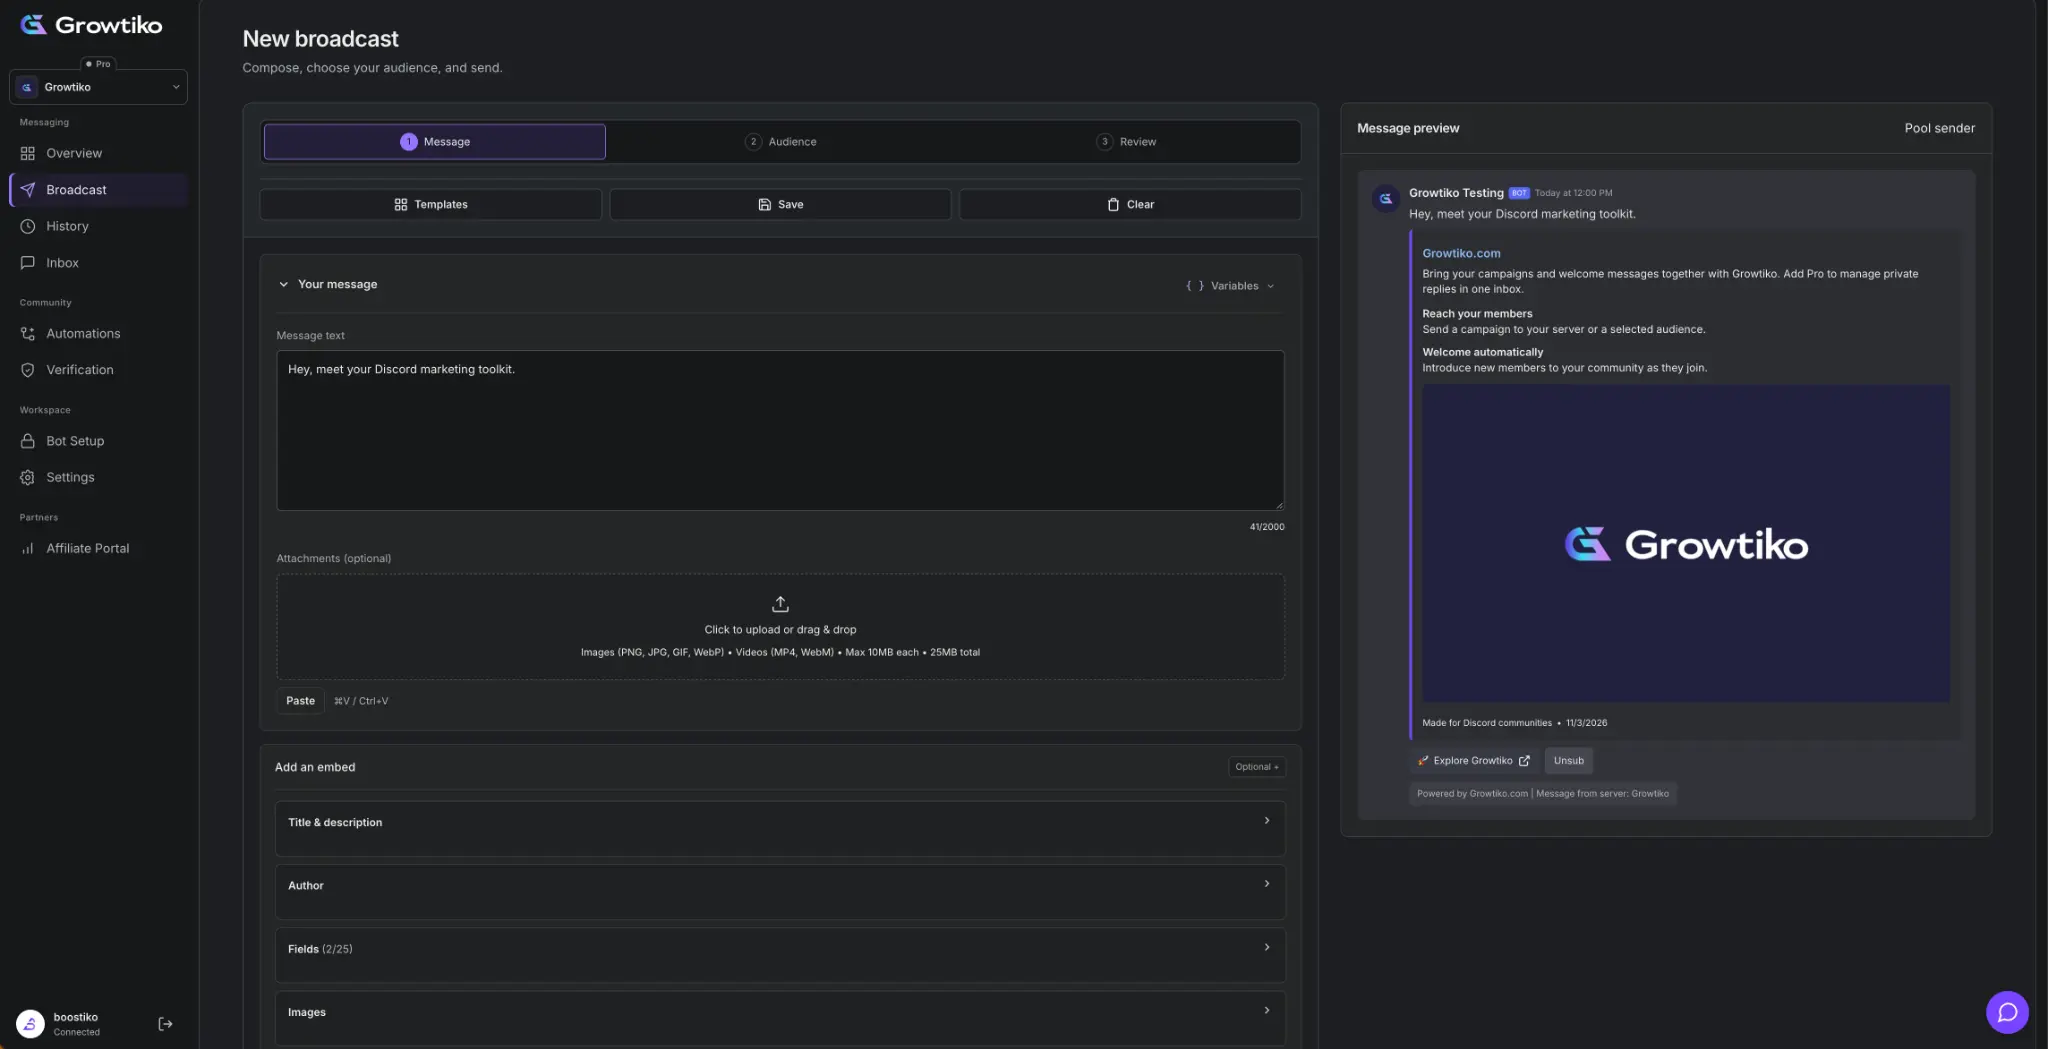
On the New broadcast screen, you will see three tabs: Message, Audience, and Review. Start on Message. Your editing controls are on the left, with a Message preview on the right.
Keep that preview visible while you work. It helps you check the order of your text, image, embed, and buttons without leaving the composer.
2. Write your message and add optional media

View screenshot 2 at full size
Under Your message, write the text you want to send. Keep the main point clear and give the recipient one useful next step. For example, a reminder someone requested might say:
Your booked workshop starts tomorrow at 3 PM. Check your booking email for the joining link.
Replace those details with your actual event information. The composer shown has a 2,000 character message counter, but you do not need to fill it.
If an image or video helps explain your message, add it under Attachments. The screen lists PNG, JPG, GIF, and WebP images, plus MP4 and WebM videos, with a maximum of 10 MB per file and 25 MB total in this composer.
Use Add an embed when you want a structured message card. You can add a title and description, author, fields, images, and a footer. Add a link button gives the recipient a clear action to take. These additions are optional; plain text is enough for a first test.
The supplied screenshots show different drafts during composition. The finished example uses “Hey, meet your Discord marketing toolkit.” You can use your own message throughout.
Check the preview, then select Continue to choose the audience.
3. Choose your Discord mass DM audience

View screenshot 3 at full size
The Audience screen asks Who should receive it? You have several choices:
All Members selects eligible server members for DMs.
By Role selects members with a chosen role.
Specific Members lets you choose individual recipients.
Channel publishes in a Discord channel rather than sending a DM.
Test (Me) sends only to your own account and is marked as free in the selector.
For a Discord mass DM, select the eligible audience that matches the message and your recipients’ permission. Use By Role or Specific Members when you only need to reach part of the community. All Members is highlighted in the screenshot, but it is not automatically the right choice for every campaign.
Before sending to a broader audience, choose Test (Me) to check the message yourself. The review screenshot in the next step shows that test audience.
The selector also reminds you that opt out preferences and delivery permissions still apply. An audience option is a targeting control, not permission to contact everyone it includes.
Select Continue to move to the final review.
4. Review the message and select Send Now

View screenshot 4 at full size
On Review, check the server and audience under Broadcast details. For this test, the audience should say Your Discord inbox (test). The example also shows Recipients: 1 and a Free test plan.
Look through the message preview again. Check spelling, image placement, embed fields, and where each link goes. Review the estimated delivery time, but treat it as an estimate rather than a guarantee.
You can give the broadcast a recognizable name so it is easier to identify later. Under Schedule & Settings, the screen includes Show Growtiko watermark and Schedule for later. Leave scheduling off when you want to send this test now.
Once the audience and content are correct, select Send Now. The review screen states that immediate sending starts after you select that button.
5. Open Discord and check the received DM

View screenshot 5 at full size
Open Discord and find the new conversation from the sender shown in your preview. This example arrives from Growtiko Testing and displays an APP label.
The finished message includes the opening text, a Growtiko.com embed, two fields, the Growtiko logo image, and a footer. Below the card are an Explore Growtiko link button and an Unsub control.
Compare the received message with your preview. Make sure the text reads clearly, the image loads, and the link opens the intended page. If you include an unsubscribe control, test it in your own workflow too.
A successful self test confirms how that message appeared in your inbox. It does not confirm delivery or reads for anyone else. Use it to catch mistakes before preparing another send.
Growtiko lets you prepare your Discord mass DM, choose the intended audience, and check the result with a self test before a wider send. Connect Discord to build your first campaign, or view Growtiko pricing to compare plans.
Get Started


Case study
3 min read
Learn the exact campaigns, onboarding flows, and growth tactics that helped scale a niche community in under 90 days.
Read article

DM strategy
7 min read
Plan Discord messaging around member preferences, clear permission and useful content. Learn how to segment audiences, measure outcomes and handle opt-outs.
Read article
Product tutorial
5 min read
Learn how to prepare a Discord mass DM in Growtiko in five steps: compose the message, choose an audience, review, send a test, and check it in Discord.
Read article

